LATEST UPDATES

Sunday 10 April 2022

POISSON'S RATIO

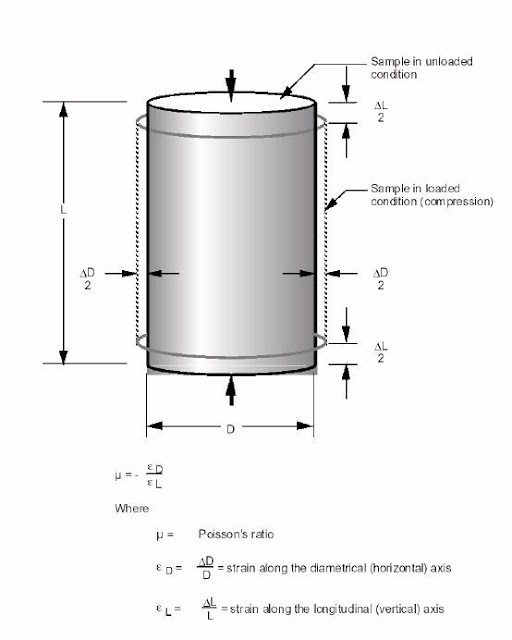
                 If a body is subjected to a load its length changes, the ratio of change in length to the original length is called as linear or primary strain. Due to this load, the dimension of the body in all directions right angle to its line of application change; the strains thus produced are called lateral or secondary strain s and are of nature opposite to that of primary strain. For example, if tensile load is applied on a body, there will be increase in length and corresponding decrease in cross-sectional area of the body. In this case tensile strain is primary and compressive strain is lateral or secondary strain.
                It is defined as the ratio of the contraction strain normal to the applied load divided by the extension strain in the direction of the applied load. Since most common materials become thinner in cross section when stretched, Poisson's ratio for them is positive.

i.e., poisson's ratio,        μ or 1/m

             Where, m is called a constant and its value varies between 3 and 4 for different materials. For a perfectly incompressible materials, the poisson's ratio would be exactly 0.5. Most practical engineering materials have 'V' between 0 and 0.5. Cork is close to 0 (zero), most steels are around 0.3, and rubber is almost 0.5. A poisson's ratio greater than 0.5 cannot be maintained for large amounts of strain because at a certain strain the material would reach zero volume, and any further strain would give the material negative volume.
POISSON'S RATIO

Poisson’s ratio for different materials: 
Material
Poisson's ratio(μ )
rubber
0.4999
gold
0.42–0.44
saturated clay
0.40–0.49
magnesium
0.252-0.289
titanium
0.265-0.34
copper
0.33
aluminium-alloy
0.32
clay
0.30–0.45
stainless steel
0.30–0.31
steel
0.27–0.30
cast iron
0.21–0.26
sand
0.20–0.45
concrete
0.20
glass
0.18–0.3
foam
0.10–0.50
cork
~ 0.00

Monday 30 March 2020

IMPACT TEST

Significance of Impact test:

            An impact test signifies the toughness of material i.e., ability of material, to absorb energy during plastic deformation. Static tension tests of unnotched specimens do not always reveal the susceptibility of a metal to brittle fracture. This important factor is determined by impact test. Toughness takes into account both the strength and ductility of the material.

           Several engineering materials have to withstand impact or suddenly applied load while in service. Impact strength are generally lower as compared to strength achieved under slowly applied load. Of all kinds of impact tests, the notched bar tests are most extensively used.

Impact tests:

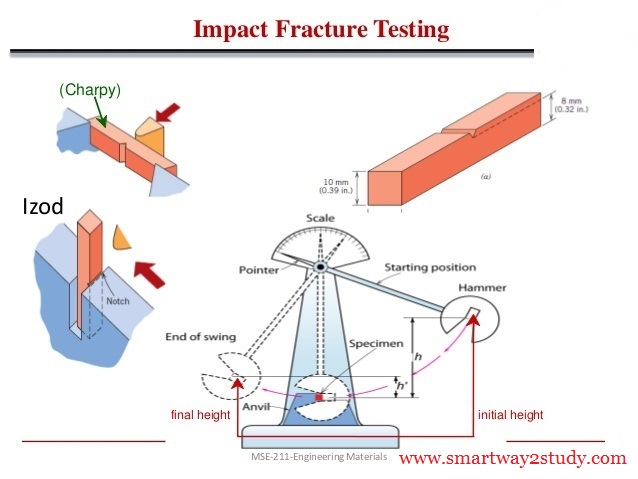
             A pendulum type impact testing machine is generally used for conducting notched bar impact tests. The following type of impact tests are performed on these machines.
    
                  1) IZOD Impact Test                            2) CHARPY Impact Test

Sunday 29 March 2020

IZOD TEST

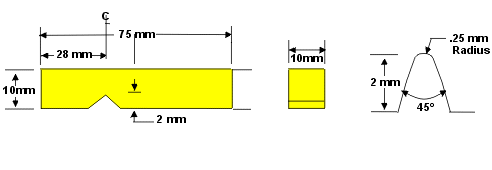
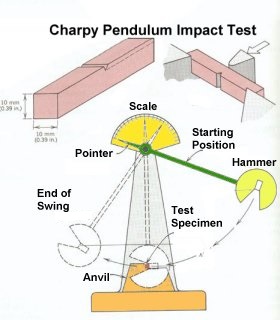
             The test uses a cantilever test piece of 10 mm X 10 mm section specimen having standard 45 ° notch 2 mm deep. This is broken by means of a swinging pendulum which is allowed to fall from a certain height to cause an impact load on the specimen. The angle rise of the pendulum after rupture of the specimen or energy to rupture the specimen is indicated on the graduated scale by a pointer. The energy required to rupture a specimen is the function of the angle of rise. Fig shows Pendulum type Impact Testing Machine.

IZOD TEST, IZOD TEST SPECIMEN
Fig shows Pendulum type Impact Testing Machine.

IZOD TEST, IMPACT FRACTURE TESTING, Pendulum type Impact Testing Machine


CHARPY TEST

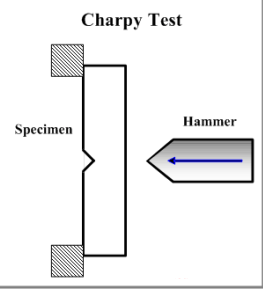
               This test is more common than Izod test and it uses simply supported test piece of 10 mm X 10 mm section. The specimen is placed on supports or anvil so that the blow of striker is opposite to the notch.

CHARPY TEST, CHARPY TEST SPECIMEN

CHARPY TEST, CHARPY TEST SPECIMENCHARPY TEST, CHARPY PENDULUM IMPACT TEST, PENDULUM IMPACT TEST


The energy used in rupture the specimen in both Charpy and Izod tests is calculated as follows:

Initial energy = WH = W(R-R cos α) = WR (1- cos α )
Energy after rupture = WH1  = W(R-R cos β) = WR(1- cos β)
Energy used to rupture specimen = WH- WH1
                                                       WR (1-cos α) - WR (1-cos β)
                                                       = WR [(1-cos α) - (1-cos β) ]
                                                       = WR [cos β - cos α ]

Where, W = Weight of pendulum/strike
               H = Height of fall of center of gravity of pendulum/strike
               H1 = Height of rise of center of gravity of pendulum/strike
               α  = Angle of fall
               β = Angle of rise, and
               R = Distance from C.G of pendulum/striker to axis of rotation O.

Effect of important variables on impact strength:
  1. Angle of notch. There is no appreciable effect of notch angle until its value exceeds 60°
  2. Shape of the notch. As the sharpness of the notch increases the energy required to rupture the specimen deceases.
  3. Dimensions of the specimen. By decreasing the dimensions of the specimen the energy of rupture decreases.
  4. Velocity of Impact. The important resistance decreases above certain critical velocity, this varies from metal to metal.
  5. Specimen Temperature. The temperature of specimen for a particular metal, determines whether the failure will be brittle, ductile or mixed character.

CHARPY TEST, IMPACT FRACTURE TESTING

@2017 All Rights Reserved. Designed by WWW.SMARTWAY4STUDY.COM !!!! Sitemap !!!! Blogger Templates